 I got this idea from a sample on splitcoast and I'm sorry I can't give credit because I can't find it now. This is a much changed up version, but still got its inspiration from another creator. This is a 5 1/2" square chocolate card with a little less than 1/2 of a Groovy Guava Carousel Note on the top half. I added a little dry embossing and paper piercing on each scallop with the crop-a-dile and paper piercer for fun. The focal point and wording are stamped from the Fresh Cuts set and they also have a little paper piercing just for fun. I know a lot of folks hate to cut out images, but these flowers are really easy and with a brad add a lot of dimension to the card. I pulled out a little of the chocolate chip satin ribbon from last winter's stash to add some texture and finish off the card. Very elegant and easy card for a special thank you.
Set: Fresh Cuts
Cardstock: Chocolate Chip, Very Vanilla, Certainly Celery
Ink: Certainly Celery, Groovy Guava, Chocolate Chip
Accessories: Paper Piercer, Vintage Brads, Crop-a-dile, Chocolate Satin Ribbon
I'm back. Long week. But successful week.
So my little man is 1... hard to believe. For those of you who don't know me, he's not really my baby. He's my best friend's baby. But I love him just the same. He's so sweet and he had such a wonderful birthday party. The theme for his invite and all of the items at the party was from the Wild About You set. Very cute. We made centerpieces for the tables, covers for the CD's that they handed out, little toothpick toppers for the cupcakes and sandwiches and lots more. It turned out so fabulous. Sneha did a great job. I'm going to scrapbook an amazing picture I took of him and I'll post the page later this week. But for now, sticking with the jungle theme, this is the card I made for him.... from the Older and Wiser set... the monkey-- just like him. Set: Older and Wiser
Cardstock: Close to Cocoa, Rose Red, Bashful Blue, Certainly Celery, Whisper White
Ink: Basic Black
Accessories: Bashful Blue and Rose Red DSP, Cutie Pie DSP, Paper Piercer, Bashful Blue Brads, Dimmensionals
Greetings from Denver-- I'm actually traveling this week. Recruiting for my day job. In Denver the last couple of days and leaving this evening for Tuscon... returning Thursday evening for home in NC. Get this. Left NC on Sunday in record breaking 100+ degree humid heat, and arrived in Denver to 66 degree windy weather, and will go to Tuscon to 105 degree dry heat today. Good Lord, if I'm not sick by the time I return, I'll be one lucky duck.
Gotta get back because my little man, my best friend's baby Devak's big first birthday party is Saturday. CANNOT miss this big occasion. I cannot even imagine where this year went. This guy has grown up so quickly.
Anyway, greetings from the west. And, I promise to post a creation next week when I get back to my stamping desk. Hope all is well with you.
 I'm usually pretty good about remembering birthdays... but I'll tell you lately I haven't been. I have a birthday calendar at home. I have it in my palm pilot with pop-up reminders and honestly, I usually have the card ready in time, but I just don't get it mailed in time. I pride myself on being prompt, organized and almost OCD, but I'm not sure what's up lately. So this little turtle from the level 3 hostess set, Older and Wiser is very appropriate for me lately. I thought he was very very cute!
This is a relatively simple but sweet card. The image is colored in with blender pens and ink pads. I used Green Galore and Creamy Caramel mostly... but then came in with Close to Cocoa and Old Olive (shocker, I know) to add a little shading. Then I added a three dimensional party hat also colored in with blender pens. Lots of layers-- which is kinda my trademark. The designer paper is Summer Picnic from the current Occasions Mini. Last but not least to add a little texture (another Amy trademark) i added a slit punch with a turquoise brad and slide the focal point underneath. Then added the greetings in Basic Black and we're done. Lots of layers but not lots of trouble. I think this card could get you out of hot water with any friend.
 Just as promised here is another sample using the Fresh Cuts set and Note Cards. Yesterday's sample was very simple. Today's is a little more detailed.
Got this card, I stamped the main image from the set in Perfect Plum, which I haven't used in forever, on the front of the note card. Then I stamped the vine in Mellow Moss along the top. I paper Pierced around the outside and added a Plum and Moss flower in the middle with a 1/2 bead from the Pretties Kit on top. On the inside is a layer of Mellow Moss cardstock on top of a layer of Perfect Plum. I stamped the vine in Versamark peaking through the holes of the flower. Last but not least I cut the entire card down 1/8 inch and layered the entire card on a layer of Perfect Plum. If I could do it again, I'd forget the Moss vine on top... but otherwise, I like it.
It's been a while... but I'm back and excited about the Fresh Cuts set and note cards. For those who don't already know, Stampin' Up! is giving us a sneak peak at the new fall catalog by letting us pre-order one of the new sets-- Fresh Cuts... and the gorgeous laser cut cards that accompany it... during the month of June. The set is 21.95 and the note cards are only $5 for 15 cards and envelopes. Love that bargain!
So here's a simple sample for you with the set and note card. This sample is very simple and highlights the card, rather than the set. Tomorrow's sample will highlight the set more.
 This sample has some polka dot Amethyst Designer Paper in the middle of the card poking through the holes of the flower. I stamped the vine from the set in Certainly Celery and the For You in Basic Black. I stamped the flower from the set in Almost Amethyst and cut it out and stuck it in the middle of the flower and added a celery button on top. Then I layered the entire card on a layer of Celery cardstock that I scalloped with the corner rounder punch. Isn't that pretty?
 I find that anything I can do with candy-- and chocolate candy is even better-- is sure to be a hit. This idea is an abbreviated version of a Hershey Stick holder that I found at this blog a while back. I finally got around to playing with it. For this version of the Hershey Stick holder, I used Chocolate Chip and Wild Wasabi cardstock along with Afternoon Tea designer paper and Chocolate twill.
 1. The bottom Chocolate Chip layer is 11 x 3" and is scored on both ends at 5 3/8" creating a little groove in the bottom for the sticks to sit in.
2. The top Wild Wasabi layer is 5 1/2 x 3" and is scored at both ends at 2 5/8" to crate a little groove in the top for the sticks to fit in.
3. Adhered the Afternoon Tea paper on top of the Chocolate Chip cardstock.
4. Stick the word window punch in as far as you can over the Afternoon Tea paper, lining it up with the right side and punch. Now, keeping it in as far as it will go, line it up with the right side and punch. This makes the punch go longer across.
5. Add three of the Hershey sticks in the packet, with the tops sticking out through the Word Window punchout.
6. Take a piece of sticky tape and tape the top and bottom of the Chocolate Chip cardstock together at the very top.
7. Punch a Groovy Guava scallop and a large Chocolate Chip Circle and adhere them together. Then adhere the entire thing to the center of the front of the Wild Wasabi piece. Punch a small circle through the entire thing-- the large Chocolate circle, Guava scallop and the Wasabi.
8. Add a couple pieces of sticky tape to the back inside piece of the Wild Wasabi piece and adhere it to the back of the Chocolate Chip piece.
9. Stamp your greeting on Groovy Guava and cut into a small tag. Punch a 1/8" hole in the end.
10. Slide Chocolate twill under the front of the holder and tie in a knot, threading the tag in before finishing the knot.
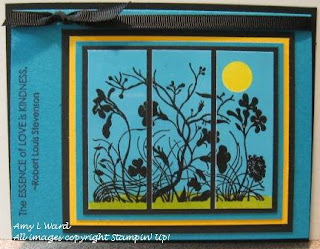 Another club project here... again using Essence of Love from the Occasions Mini. For this card, I black embossed the image on glossy white cardstock and then with a piece of ripped scrap paper covered up the top part of the image and sponged some Old Olive ink over the bottom or "grassy" part of the image. Then I took a 1/2 circle punch of a sticky note and covered up a spot in the sky. I took the reverse of the ripped scrap paper and covered up the Old Olive sponged grass I just did and brayered Taken with Teal ink over the rest of the image. I removed that 1/2 inch circle sticky note mask I put in the sky and reverse masked it with the rest of the sticky note and filled it in with some Summer Sun ink.... and voila the main image of the card is done.
The main image is 3" wide by 2 3/4" tall... so I cut the image into three one-inch strips and then started mounting. I can hear my mom in the my head saying... "how much with this cost to mail?" First on Basic Black, then Taken with Teal, then Summer Sun, then again on Basic Black. Put all that on the Taken with Teal card, and finally on a Basic Black postcard. Add your greeting along the side in Basic Black (by the way, have I mentioned, how much I LOVE this greeting?)and some black grosgrain ribbon across the top and you are finally done.
There are a lot of steps to this card and I wouldn't want to make 50 for a convention swap... but a few are definitely worth it! I find it to be a stunning card!
 Don't you just love when you find cute little items that you can jazz up with your stamps and creativity? This was one of those items. It was a simple pack of wildflowers. I took the plain ol' sticker off the front and got my creativity in gear. This is a door prize for my stamp club tonight!
I used the Essence of Love stamp set to create a new focal point for the front of the pack. I really do love this set. It is stamped in Chocolate Chip on Kraft cardstock. Then I cut it into three equal parts and layered it onto Chocolate Chip cardstock and re-layerd it onto some Afternoon Tea designer paper. The wide chocolate grosgrain ribbon runs from top to bottom, front to back. I added the butterfly from the set all layered up on the scallop punch and a "for you" tag to finish it off.


