 Stampin' Up! is celebrating the holidays early by giving YOU up to 50% off on some of their best selling products. They have created fourteen "bundles" of products that you can order for 20-50% off the catalog price. WOW! They must be in the spirit!
Click here to download a listing of the sale bundles... and then head over to my SU site to place your order. Clip on "Shop Now" and it will take you to the specials.
This is a great time to take advantage of this sale and stock up for yourself or those on your holiday gift list.
Sale is only good through December 1st and while supplies last, so don't be shy. Order today!
 As you probably remember, I'm a rub-on JUNKIE! Seriously! So this month's special is right up my ally. I have more rub-ons right now than any person should have. I'm in rub-on heaven!
So, here is a simple little card, very easy to make, because it uses a rub-on instead of much stamping.
This is a little 4 1/4 x 4 1/4" square card. The card itself is Whisper White, on a layer of Baja Blue, and then a back layer of Chocolate Chip. You'd probably noticed this, but I frequently make my cards a 1/4" smaller and back them on a postcard size complementary color. I think this really makes the images on the card POP with that color in the background.
Anyway, I did stamp some snowflakes from the Snow Burst set on the White card in Versamark. If you've never stamped Versamark on white, give it a try. It's a great effect! Then I added the "My Wish List" rub-on from the Season of Cheer rub-on set in the mini catalog. Last but not least, I added one of the Baja Blue little felt snowflakes with a clear rhinestone brad in the middle (from the Pretties kit).
This card would be nice to add to gift/package.
Set: Snow Burst
Cardstock: Whisper White, Baja Blue, Chocolate Chip
Ink: Versamark
Accessories: Season of Cheer Rub-ons, Little Felt Snowflakes, Clear Rhinestone Brads
 So here is the other acrylic Snow Swirled card I promised (last week!) It's probably hard to even tell that it's acrylic but it is.
The card is whisper white, with a layer of real red, and the bottom half of the red layer is covered with Ski Slope DSP (ripped). The focal point is two layers of the Top Note Die cutout. The bottom layer is white and has snowflakes from the Merry & Bright set stamped with Dazzling Diamonds glitter added. The top layer is made with an acrylic overhead (you know from high school)-- any type of acrylic sheet will do. I stamped the tree from Snow Swirled on the acrylic layer with red stazon ink. I added a couple of clear rhinestone brads on the edges for texture and BLING, then a tag with white taffeta ribbon.
Another simple card, but with an extra special little zing!
Sets: Merry & Bright, Snow Swirled
Cardstock: Whisper White, Real Red
Ink: Basic Black, Versamark, Stazon Red
Accessories: White Taffeta Ribbon, Clear Rhinestone Brads (from Pretties kit), Dazzling Diamonds, Two Way Glue Pen, Top Note Die
 Did you know that you can run over 50 different materials through the Big Shot? Everything from materials to leather to think metal. Well, I hadn't used anything but paper in there, so I decided to try some acetate with my Top Note die. Love what happened!
This is a really simple card. I ran a sheet of acetate (an overhead basically) and some Real Red cardstock through the Big Shot with the Top Note die and cut them both in half. I stamped the tree from the Snow Swirled set in Stazon White on the acetate and added a clear rhinestone brad (from the Pretties Kit) for some "bling."
The card itself is Chocolate Chip, with a layer of Real Red and a layer of Old Olive. The focal point (the tree) is mounted on the Old Olive layer, with a small sliver of Ski Slope Designer Paper running along the bottom. BTW, I LOVE this designer paper-- especially this design. Sorry to digress! The greeting is stamped in Chocolate Chip Ink and you know I have to add some ribbon for texture. This ribbon is the red wide grosgrain.
Tomorrow I'll have another acetate card.
Set: Snow Swirled
Ink: White Stazon, Chocolate Chip
Cardstock: Chocolate Chip, Real Red, Old Olive
Accesories: Ski Slope DSP, Rhinestone Brad, 1/16" Punch, Red Wide Grosgrain Ribbon
 Isn't this just the cutest idea. I have to admit it's not mine. I'm sure you've seen it around. My good friend Sherri has a cute version on her blog.
It's made with the medium sized oval punch-- so easy- just three punches. I sponged Pumpkin Pie ink around the edges to give some dimension and layered them. The top layer is put on with dimensionals. Then added some chocolate chip wide grosgrain ribbon and some old olive grosgrain for the "stem and leaves." Too cute!
The rest of the card is a layer of pumpkin pie on a Chocolate Chip card. The designer paper is from Autumn Vine DSP collection, with a strip of Old Olive layered on top. I poked some holes in the olive and did some faux stitching with the Chocolate Chip marker. The greeting is from the Level 3 Hostess Set Rub-ons. And there you have it.
Ink: Pumpkin Pie
Cardstock: Chocolate Chip, Pumpkin Pie, Old Olive
Accessories: Medium Oval Punch, Autumn Vine DSP, Chocolate Chip Marker, Paper Piercer, Stampin' Sponge, Wide Chocolate Chip Grosgrain Ribbon, Narrow Old Olive Grosgrain Ribbon, Dimensionals, Level 2 Hostess Rub-ons
 I'm a dog person. My life just feels pretty empty without a dog in it. So, as you can imagine, I've been pretty lonely since I lost my sweet Sallie girl. I knew I wouldn't last long... I have a new girl. Her name is Jasmine. It was just kind of happenstance that this worked out the way it did. My chiropractor has a client who has this dog. She's a four year old beagle and they need to get rid of her because her very young son has become allergic to her.
I met her a nd fell in love with her wrinkly freckled face, silky soft ears and long soft body. She is a doll. It just seemed like a perfect situation. A trained dog that has been in a good home. She's been with me for about a week and a half. Happy as can be. She hasn't missed a beat. I miss Sal like crazy but my house feels like a home again with the little furball in it. Now if I could just get her to leave my mom's cat alone!!!
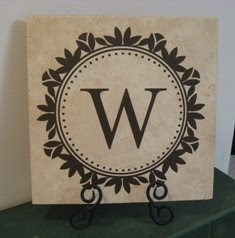 I've really enjoyed playing a bit with the Decor Elements lately. Not only did I do the Countdown to Christmas below, but I made this really beautiful plaque as well.
This is such a quick and easy project. I went to Home Depot and got a 14x14" tile. There are many single tile options available. I added the Together Forever Circle Frame with the Classic (capital) "W" in Chocolate Chip. This vinyl art is sooo easy to adhere. Directions are here. I have this elegant tile sitting on a cast iron plate stand as you enter my home.
If you haven't tried the Decor Elements yet, you should. It's definitely decorating made easy.
I'm taking a cake decorating class. Just what I need huh? Another expensive hobby. So, if I haven't mentioned it yet, I LOVE Halloween. I have all of these great Halloween ideas for decorating cookies and cupcakes.
 Here are some cute Mummy Cookies I found on the Wilton website. So easy. Basically they are just sugar cookies cut out with a gingerbread cookie cutter. Then I took white buttercream icing, thinned to medium consistency and using a #3 trip, put stringy icing all over the body-- to make it look like mummy wrappings. Then I added black icing eyes. Cute huh?
T
o give them as gifts, I put them in little cellophane bags and made a cute topper out of the Tasty Sweet stamp set. I stamped the "trick or treat" saying in Basic Black on Whisper White cardstock. Then added the swirly background stamp from the set in Tangerine Tango. Once the topper was in place I tied some Tangerine Tango ribbon in a knot and that is it. Cute and yummy!

 Stampin' Up! is celebrating the holidays early by giving YOU up to 50% off on some of their best selling products. They have created fourteen "bundles" of products that you can order for 20-50% off the catalog price. WOW! They must be in the spirit!


