I find that anything I can do with candy-- and chocolate candy is even better-- is sure to be a hit. This idea is an abbreviated version of a Hershey Stick holder that I found at this blog a while back. I finally got around to playing with it. For this version of the Hershey Stick holder, I used Chocolate Chip and Wild Wasabi cardstock along with Afternoon Tea designer paper and Chocolate twill. 1. The bottom Chocolate Chip layer is 11 x 3" and is scored on both ends at 5 3/8" creating a little groove in the bottom for the sticks to sit in.
2. The top Wild Wasabi layer is 5 1/2 x 3" and is scored at both ends at 2 5/8" to crate a little groove in the top for the sticks to fit in.
3. Adhered the Afternoon Tea paper on top of the Chocolate Chip cardstock.
4. Stick the word window punch in as far as you can over the Afternoon Tea paper, lining it up with the right side and punch. Now, keeping it in as far as it will go, line it up with the right side and punch. This makes the punch go longer across.
5. Add three of the Hershey sticks in the packet, with the tops sticking out through the Word Window punchout.
6. Take a piece of sticky tape and tape the top and bottom of the Chocolate Chip cardstock together at the very top.
7. Punch a Groovy Guava scallop and a large Chocolate Chip Circle and adhere them together. Then adhere the entire thing to the center of the front of the Wild Wasabi piece. Punch a small circle through the entire thing-- the large Chocolate circle, Guava scallop and the Wasabi.
8. Add a couple pieces of sticky tape to the back inside piece of the Wild Wasabi piece and adhere it to the back of the Chocolate Chip piece.
9. Stamp your greeting on Groovy Guava and cut into a small tag. Punch a 1/8" hole in the end.
10. Slide Chocolate twill under the front of the holder and tie in a knot, threading the tag in before finishing the knot.
Thursday, May 22
Brayered Essence
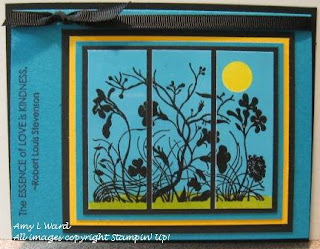
Another club project here... again using Essence of Love from the Occasions Mini. For this card, I black embossed the image on glossy white cardstock and then with a piece of ripped scrap paper covered up the top part of the image and sponged some Old Olive ink over the bottom or "grassy" part of the image. Then I took a 1/2 circle punch of a sticky note and covered up a spot in the sky. I took the reverse of the ripped scrap paper and covered up the Old Olive sponged grass I just did and brayered Taken with Teal ink over the rest of the image. I removed that 1/2 inch circle sticky note mask I put in the sky and reverse masked it with the rest of the sticky note and filled it in with some Summer Sun ink.... and voila the main image of the card is done.
The main image is 3" wide by 2 3/4" tall... so I cut the image into three one-inch strips and then started mounting. I can hear my mom in the my head saying... "how much with this cost to mail?" First on Basic Black, then Taken with Teal, then Summer Sun, then again on Basic Black. Put all that on the Taken with Teal card, and finally on a Basic Black postcard. Add your greeting along the side in Basic Black (by the way, have I mentioned, how much I LOVE this greeting?)and some black grosgrain ribbon across the top and you are finally done.
There are a lot of steps to this card and I wouldn't want to make 50 for a convention swap... but a few are definitely worth it! I find it to be a stunning card!
Tuesday, May 20
Wildflowers
Don't you just love when you find cute little items that you can jazz up with your stamps and creativity? This was one of those items. It was a simple pack of wildflowers. I took the plain ol' sticker off the front and got my creativity in gear. This is a door prize for my stamp club tonight!
I used the Essence of Love stamp set to create a new focal point for the front of the pack. I really do love this set. It is stamped in Chocolate Chip on Kraft cardstock. Then I cut it into three equal parts and layered it onto Chocolate Chip cardstock and re-layerd it onto some Afternoon Tea designer paper. The wide chocolate grosgrain ribbon runs from top to bottom, front to back. I added the butterfly from the set all layered up on the scallop punch and a "for you" tag to finish it off.
Friday, May 16
Lovin' The Die Cuts
This is a simple congratulations card that I made for a friend that just graduated with her Bachelors Degree. This was a long hard win for her. I took her quite a while to get here, but I can't begin to tell you how proud I am of her for her perseverance and determination to make this happen. She's quite a special friend.
This card uses the Die Cut Blooms, Beautiful Day Rub-Ons and Summer Picnic designer paper from the Occasions Mini as well as Flower Fusion and Pumpkin Pie Grosgrain Ribbon. Very Simple, but elegant card. Hope you like it.
Thursday, May 15
Chipboard Mania
Chipboard is all the rage... in fact all chipboard sets are 25% off this month with any $35 purchase. Isn't this chipboard a cute focal point on this journal?
This journal is covered with Berry Bliss designer paper and the ribbon in the middle is from the ribbon originals from last year's spring mini. The words are from So Very, one of last year's Sell-a-Bration sets and are stamped in Chocolate Chip ink. And, of course the chipboard heart- from On Board Accents- is the center of attention. I've covered it with Versamark ink and then Heat and Stick Powder and heated it with the heat tool-- which makes it super sticky so the Fine Cosmo Glitter will stick to it.
Believe it or not... I'm normally not a huge glitter fan... but you sure would think I am from the looks of this! Too cute huh?
FYI: I have the journal in a cello sleeve to protect the glitter which is causing the glare in the picture.
Sunday, May 11
Promotions GALORE
Get on Board With Chipboard!
Spend $35 on Stampin' Up! products and get 25 percent off any On Board items from the Spring-Summer Collection.
Cutting Combo Pack Special Offer!
Buy a Cutting Mat and get a Hobby Blade for FREE!
Expand Your Toolbox Recruiting Special!
Join Stampin' Up! as a demonstrator and get 20 percent off the Starter Kit, PLUS a free tin of Hodgepodge Hardware.
Friday, May 9
Thanks You's
I was asked to make 30 Thank You cards for the fabulous lady who organized the art/craft show last weekend. No problem.... but as always coming up with masculine cards is harder than the others because of the limited number of masculine sets I have. I recently got the Light Unto My Path set. I thought it would be a good masculine set, but also a good sympathy set... plus I just like the bible verse that accompanies the lighthouse stamp.
So, in coming up with some masculine thanks yous, I decided to use the lighthouse from this set. I used Sahara Sand and Night of Navy as the basic colors. Basically I just inked the stamp with Sahara Sand and then colored over the lighthouse and house with the Night of Navy marker to highlight that area and stamped it on Very Vanilla cardstock. Then I masked the entire lighthouse and sponged the beacon light area with More Mustard-- (I'm actually not very happy with this part, but it was too late to go back on all 10 of them.) The edges are distressed with my favorite little Cutter Kit tool and layered on Sahara and Navy cardstock. Then the Navy background is Print Pattern stamped in Versamark layered on the Sahara Sand card. To add some dimension, I added some naturals hemp along with the tag greeting around main image and a jumbo pewter brad in the top left corner.
I think dad's gonna get this with a father's day greeting next month! I'm glad he doesn't read my blog :-)
Sets: A Light Unto My Path, Sincere Salutations, Print Patterns
Ink: Versamark, Night of Navy, Sahara Sand, More Mustard
Cardstock: Very Vanilla, Sahara Sand, Night of Navy
Accessories: Naturals Hemp, Cutter Kit, Jumbo Brads, Crop-a-Dile, 1/8" Punch
Thursday, May 8
A new Color Inspiration
Here is a new one... Kristina Werner's Color Inspiration... It's from the Pier I Imports Catalog. It uses the colors Whisper White, Pumpkin Pie, Bashful Blue and Brilliant Blue.
This was a challenge for me because I NEVER EVER use Brilliant Blue. I mean it's been years. But, I was pretty happy with how the card turned out. I used Life's a Breeze which I is one of the free sets I got from my SAB sales and I haven't had a chance to use yet.
I used markers to color the boat multiple colors. Then I masked the boat and took some scrap paper and ripped it to make wave and sponged the water with Bashful Blue. I also sponged the sun using the 1/2 inch circle punch and Summer Sun ink. I added the bubbles in Versamark for a background, the Pumpkin Pie designer paper from Bali Breeze for a little contrast and a few Brilliant Blue brads for some texture. So, whadaya think?
Set: Life's a Breeze
Ink: Brilliant Blue, Versamark
Cardstock: Bashful Blue, Brilliant Blue, Pumpkin Pie, Whisper White
Accessories: Brilliant Blue, Pumpkin Pie, Green Galore Markers, Bali Breeze DSP, 1/2" Circle Punch, Bold Bright Brads, Stampin' Sponge, Dimmensionals
Wednesday, May 7
My First Blog Award-- I'm so Honored
Thanks to my good friend Sherri Barron who nominated me the Arte Y Pico Blog Award. I've never been nominated for a blog award before. I feel so special. Apparently the award was originally designed by Eseya at Arte Y Pico and is to be given to bloggers who share their art and creativity making their contribution to the blogging world. Thanks Sherri for thinking that I fit that description!
As the nominee I am supposed to pick five blogs that, based on their creativity, design, interesting material, and contribution to the blogging community, I think earn the award. I am listing their names and links to their blogs, on mine, and leave a comment on one of their posts to let them know I've nominated them! Each winner shows the award along with the name of the person who gave them the award with a link to their blog. Below are my nominations...
1... Jennifer Diercks at I got Stamps
2... Michelle Wooderson at Mish Mash
3... Patty Bennett at Patty's Stampin' Spot
4... Kristina Werner at KWerner Design
5... Taylor Van Bruggen at Taylored Expressions
Monday, May 5
Art Show Part III
So I promised to show you a few of the items close up that I made for the art/craft show.
Here is a cute little bucket that I decorated with the SAB rub-ons Love & Happiness. Then I filled it with a 5-pack of assorted gift cards and a pen decorated with the same rub-ons. I also included a gift tag on the handle. I had assorted buckets in different colors with different color rub-ons on them.
I also made up packs of gift tags. I did this at a Christmas show and they went like hotcakes. So I decided to do it again and try both Christmas tags and birthday tags. There are 15 tags in each (3 each of 5 designs). The cute little packet is just made with a large flat cellophane bag.
Last but not least, I made these cute card organizing tins that included 5 assorted greeting cards-- perfect for Mother's day. I recently did this as a class also.
Art Show Part II
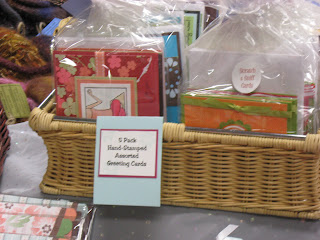
So the Art/Craft Show was a huge success in several ways. It was sooo much fun. The organizers were fabulous and such fun and nice people. The other artists were also really nice people. It was really laid back and there was no competition as everyone seemed to be there for the same reason-- to raise money for this worthy organization-- which was really nice! We had a steady flow of traffic and I sold a lot of items, plus I made a lot of contacts-- which I was pretty happy about. Here are some pictures of my table and some of the items I sold. I'll add a few others in the coming days.
Friday, May 2
At the Art Show
So this is the big weekend of the art/craft show. A co-worker invited me to have a booth at this show and I really didn't want to disappoint her. It's kinda neat. A group of moms, several years ago, started this non-profit and have been doing things to raise money for worthy community organizations. One of the things they started was this art/craft show. So, at least a quarter of the proceeds from our sales go to this local organization Carolina Outreach Foundation who's mission is this:
Work with families of children with behavioral, emotional, and mental health disabilities to provide them opportunities for recreation, vocational internships, and academic support.
Well, this is right up my ally. I used to be a teacher and I'm a huge child advocate. So I'm very happy to be working towards an organization that wants to better the lives of children. This is the 6th year for the show and we are hoping it is the best year yet. I've been working my butt off making things for this show. I've shown you a couple of things I've made here on the blog, but didn't want to spoil it for some of my customers who might be coming. So, next week, I will show you some pictures of my table and some of the items I am selling. I hope I do well. I'd like to be able to contribute well to the organization... plus I really don't want to bring this stuff home! Wish me luck!
Not much Stampin' Here
This card is a unique combination of the rub-ons from the Beautiful Day collection in the Occasions Mini on some Purely Pomegranate cardstock along with Flower Fusion in Pumpkin Pie and Old Olive. Actually I think it's cool how some of the rub-ons from this collection fit inside the scallop punch (whileothers fit inside the Die Cut Blooms)-- this is a very versatile set of rub-ons! I also added a little olive twill for dimension around the stems-- also made out of rub-ons from the same collection. The saying "Make a Wish" (also on Purely Pomegranate) is actually one of the sayings from the set She's All That.
By the way, what exactly are we going to do when Purely Pomegranate goes away at the end of this year? I'm not sure I can stand it. It IS BY FAR my favorite color E-V-E-R... all of my customers are freaking out about it too! I think I'm going to have a wake for it!
Set: She's all That
Ink: Basic Black
Cardstock: Old Olive, Purely Pomegranate
Accessories: Beautiful Day Rub-ons, Black Brads, Scallop Punch, 1/8" punch, Olive Twill, Flower Fusion
Subscribe to:
Posts (Atom)